

Read More

Recognized for AI Excellence at 2026 Globee® Awards - Read More
Cloud and DevOps
Updated: May 18, 2026
How to Install Jenkins on Different Operating Systems (Windows, Ubuntu, Mac)?
Verified Expert in Cloud-Native Engineering

Quick Go-Through: Jenkins is an accessible, open-source automation server based on Java. It helps develop, test, and deploy software development phases to accomplish fast application deployments in a production environment. This blog will discuss how to proceed with Jenkins download on different operating systems. Read on to know more. Hope you enjoy!
Installing Jenkins..err..err..err
Have you ever faced this issue? I'll be stunned if you say no, as this is the issue every software developer faces more than once in their career. And it's no big deal! So, on this note, let me welcome you to a guide on Jenkins download.
Firstly, let's talk about Jenkins and its market - Jenkins is the #1 server in continuous integration with a 45.12% market share. Moreover, it is also the industry's oldest player (so you can understand its popularity).
Jenkins is a free, open-source automation server based on Java. The system helps develop, test, and deploy phases of software development to accomplish fast application deployments in a production environment. It's also the leading automation server available in the market. Moreover, the Jenkins services, let you easily integrate continuous integration (CI) and continuous delivery (CD) environment for different languages combination and source code repositories with the help of CI/CD pipelines.
Experience Advanced Scaling and Automation with Jenkins Software Development
Consult Us Today
Jenkins enables businesses to accelerate and automate their software development process. Automation makes it effortless for software developers to integrate modifications and for users to acquire innovative solutions. Jenkins also has strong community support, with many developers consistently working on designing new plugins to accomplish more from Jenkins.
When thinking to install Jenkins, you can also enjoy the integration of different DevOps tools. Furthermore, Jenkins currently has 1700+ plugins available. It is adored by development teams of all sizes and for other programming language projects like PHP, Java, Dot Net, Ruby, etc.
Furthermore, it's also easy for developers to create CI/CD pipeline with Jenkins. Because it’s an autonomous platform that can be used on different operating systems like Windows, Mac, and many more. The traditional Jenkins download method is to use the installers present on the official Jenkins website or with the help of a package manager by your local operating system.
In this blog, we'll learn to install Jenkins on different operating systems, i.e., on Windows, Linux (Ubuntu), and MacOS. However, before directly diving into the technical part and learning to install Jenkins on different operating systems, let's start with some Jenkins basics (like a warm-up).
Come on, then!
On This Page
Why Use Jenkins?
Henkins is used widely because it’s an open-source automation server that supports the continuous integration and delivery of software projects. It lets developers build, test, and deploy the code quickly.
Here’s a quick idea on continuous integration (CI) and continuous delivery (CD) as well. Let's go through it.
Continuous integration – Continuous integration is the practice of continually combining the functional copies of software developers with the prime repository.
Continuous delivery – Continuous delivery refers to the constant code delivery to a location once it is ready for delivery. It can be both for production and staging. The solution is then provided to a consumer base that can deliver any feedback or QA by customers.
Developers must update the code consistently in the shared repository (you can go for GitHub or TFS). Any modifications to the source code are carried out at the end of the day altogether, making it a bit challenging to identify any loopholes or errors. Therefore, to avoid this, developers install Jenkins and use it.
- Once a developer updates the repository, Jenkins will automatically allow the build and quickly warn you in case of any error or loophole (Continuous Integration).
- Moreover, you can also easily automate the post-construction tests (unit test, success test, acceptance test) with Jenkins setup.
- Jenkins then conducts these different tests and generates a report whenever you accomplish the progress (Continuous Delivery).
Therefore, with the help of Jenkins setup, the CI/CD services develop top-notch apps while maximizing workflow efficiency. This is what every company needs!
I bet now you understand why it's vital to install Jenkins for your business.
Let's now move ahead and run through another essential aspect of Jenkins download, i.e., the advantages of Jenkins.
Advantages of Jenkins
Following are some best advantages you can experience when thinking to install Jenkins:

Easy to Use – Using Jenkins is straightforward, intuitive, and provides a visually appealing user interface.
Extensibility – Jenkins server is highly flexible and easy to adapt to your needs and requirements. Integrated with various functionalities, Jenkins includes thousands of open-source Plugins.
Easy Installation - Based on Java, Jenkins is a platform-independent app. Therefore, it's easy to install Jenkins for all operating systems. Even after Jenkins download, its Console is readily available over a WebUI.
Rapid Automation - Jenkins minimizes the overall chance of any errors or loopholes as the whole work is done automatically without any manual intervention. This is why there is a decrease in errors caused by manual methodologies, and there is 24*7 monitoring, which is impractical with manual intervention.
Open-Source Tool - Jenkins is a free-to-use open-source CI/CD orchestration tool. It has comprehensive and extensible documentation present. The Jenkins community is vast and ready to help you anytime.
Massive Plugin Ecosystem - Jenkins acquires over 1700+ plugins (yes, you read it right) available to extend its functionality. Not only these, but more plugins are being developed consistently. If you want a plugin and it's not available, you can code it and directly share it with the community.
Follows CI/CD Perfectly - With the help of Jenkins setup, developers can easily integrate a continuous integration (CI) and continuous delivery (CD) environment and help combine different languages and source code repositories with the help of CI/CD pipelines.
That was all for the warm-up part, and I hope you're now familiar with Jenkins and ready to move to the next level.
Speed-Up Your Development Cycles and Reduce Build Times with Jenkins Services
Choose Best Jenkins Services
In the following sections, we'll answer how to install Jenkins for different operating systems. But here's the deal – be with me till the end, and I promise to make this technical part seamless and easily understandable.
So, why wait? Let's buckle up.
Jenkins Installation on Windows
Let’s begin by understanding the pre-requisites of installing Jenkins on Windows.
Pre-Requisites to Install Jenkins on Windows
Following are some essential pre-requisites:
Minimum hardware requirements:
- 256 MB of RAM
- 1 GB of drive space
Suggested hardware configuration for a small team:
- 4 GB+ of RAM
- 50 GB+ of drive space
Important Note - JDK8+ is compulsory for all operating systems. So, before thinking of Jenkins download, you must first install JDK8 or its higher version. You must download and install it.
The Jenkins server operates as a Windows service and needs a Windows account to execute the service. The installer offers the choice to use the existing LocalService account. And for software developers, I would suggest building a new account, especially for running Jenkins.
To execute any operation from the command line, you must first install the Carbon PowerShell module. It offers many valuable CMDLets for handling Windows, and you'll have to use one of these to allow the new Jenkins user all the rights to log on as a service.
Execute this PowerShell command to install Carbon from the PowerShell Gallery:
Install-Module -Name 'Carbon' -AllowClobber
By default, PowerShell will prevent you from executing code from an external source. So, to eliminate this warning, run the following command:
Set-ExecutionPolicy -ExecutionPolicy RemoteSigned -Scope CurrentUser
You then import Carbon:
Import-Module' Carbon'
The following step is to build a user called jenkins to execute the Jenkins Windows service:
net user jenkins Password01! /ADD
Finally, you need to allow the jenkins user permission to log on as a service:
Grant-CPrivilege -Identity "jenkins" -Privilege SeServiceLogonRight
Steps to Install Jenkins on Windows-
Step.1: Setup Wizard
First, open the Windows Installer, and there you'll find an Installation Setup Wizard, Click Next on the Setup Wizard to start your Jenkins download.

Step.2: Choose the Destination Folder
Choose the destination folder to store your Jenkins downloads and click Next to move forward.

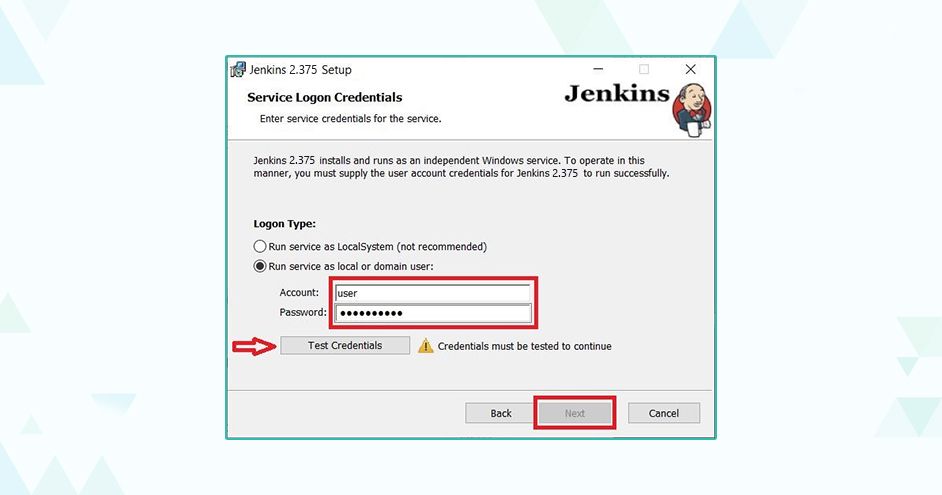
Step.3: Service Logon Credentials
When you install Jenkins on Windows, it is often suggested to install and operate Jenkins as an independent Windows service using a local or domain user (what we did above with the help of the Carbon PowerShell Module). Why? Because it is much better and safer than to install Jenkins using LocalSystem (Windows equivalent of the root) , which allows Jenkins full access to your system and services.
So, to run Jenkins service with the help of a local or domain user, you need to define the domain/module user name and password with which you want to operate Jenkins. Then click on Test Credentials to test your domain credentials and click Next.
Step.4: Port Selection
You need to specify the port on which your Jenkins server will be operating the Test Port button to verify whether the specific port is present on your system. And if the port is accessible, it will present a green tick, as shown in the below image; just click Next.

Step.5: Choose Java Home Directory
The Jenkins installation process checks for Java on your system and prefills the dialog with the Java home directory. If your system does not have the required Java version, you will need to install it.
Once you opt for your Java home directory, click Next to continue.

Step.6: Custom Setup
Select other services that you want to be installed and integrated with Jenkins, and then click on Next..

Step.7: Install Jenkins
Click on the Install button to start the Jenkins installation.

Step.8: Finish Jenkins Download (Installation)
So, once the installation is done, click on Finish to complete the installation. Congratulations! You have installed Jenkins as a Windows Service. You can easily verify this by browsing the services section, as shown in the image:

The configuration part of Jenkins on Windows and Ubuntu is the same.
When in the step to unlock the Jenkins, you need to copy the administrator password from the file located at:
C:\Program Files (x86)\Jenkins\secrets\initialAdminPassword
In the following section on installing Jenkins on Ubuntu, we'll also learn to configure Jenkins both for Windows and Ubuntu. (Just use the above syntax in the case of Windows; otherwise, everything is the same.)
Well, well! Now you have the apt answer to the question – how to install Jenkins on Windows?
Reduce Manual Tasks and Speed Up Deployment with DevOps Automation Services
Automate Your Processes
Jenkins Installation on Ubuntu
Before going through the whole Ubuntu tale, let's just understand some pre-requisites of Jenkins Ubuntu installation.
Pre-Requisites to Install Jenkins on Ubuntu
First, let me tell you a key point – Ubuntu, Debian, Fedora, etc., are all Linux distributions. So, it is also more of a Jenkins download for Linux (with a bit of difference for different distributions). Coming back to the topic, the following are some essential pre-requisites for Jenkins installation on Ubuntu:
Minimum hardware requirements:
- 256 MB of RAM
- 1 GB of drive space
Recommended hardware configuration for a small team:
- 4 GB+ of RAM
- 50 GB+ of drive space
Steps to Install Jenkins on Ubuntu
Now, let's discuss the steps of Jenkins installation on Ubuntu.
Step.1: Install Java Development Kit 11
Jenkins is based on the Java language. For it to function, you either need the latest version of Java Development Kit (JDK) or Java Runtime Environment (JRE).
And to install Java Development Kit, it's suggested to update and upgrade your Ubuntu system first, using the following commands:
sudo apt-get update
sudo apt-get upgrade
Jenkins supports both Java Runtime Environment 8 and 11. So, you can install Java 11 on your system using this command:
Now, verify if the correct Java version has been successfully installed with the following command:
java –version
You will see an output stating that OpenJDK version 11 has been installed. Feeling overwhelmed? I know the installation processes can sometimes get on our nerves. But, hey, no worries, you can hire DevOps specialists to help you with every step of Jenkins installation.
Step.2: Install Jenkins on Ubuntu
Install Jenkins by issuing the following command:
curl -fsSL https://pkg.jenkins.io/debian-stable/jenkins.io.key | sudo tee /usr/share/keyrings/jenkins-keyring.asc > /dev/null
Then type:
echo deb [signed-by=/usr/share/keyrings/jenkins-keyring.asc] https://pkg.jenkins.io/debian-stable binary/ | sudo tee /etc/apt/sources.list.d/jenkins.list > /dev/null
For the new modifications to take effect, run the following:
sudo apt-get update
Once the changes get updated, execute the following command to install Jenkins:
sudo apt-get install jenkins
When prompted for confirmation, enter Y, and hit Enter to begin the installation process.
Step.3: Start Jenkins on Ubuntu
Once you've installed Jenkins, start the service on Ubuntu with this command:
sudo systemctl start jenkins.service
You can verify the Jenkins service status with the following:
sudo systemctl status Jenkins
If it is running fine, you will see the following output on the terminal:

Step.4: Set UFW Firewall Rules for Jenkins
Jenkins, by default, uses port 8080. To ensure this port is accessible, you must adjust firewall (security system) protocols with UFW.
To allow port 8080 to listen to upcoming connections, execute the following command:
sudo ufw allow 8080
If the rules are successfully updated, you will notice a confirmation message on the command line stating the same.
Next, enable UFW with this command:
sudo ufw enable
Check the status of UFW by typing:
sudo ufw status
As a result, you will see that port 8080 has been allowed and is actively listening for new connections.

Step.5: Access the Jenkins Dashboard on a Web Browser
To launch and configure the Jenkins server, open a browser, and enter the IP address of your server in the following format:
http://ipaddress:8080
If you are running Jenkins locally, it can be accessed using the following:
http://localhost:8080
To unlock Jenkins, you must authenticate yourself by providing the password in the /var/lib/jenkins/secrets/initialAdminPassword file.
The file permissions don't allow users access as it is a password file. Open the command line and run the following command to become a root user.
sudo –i
Now run the following command to get the password from the file:
nano /var/lib/jenkins/secrets/initialAdminPassword
You will find an alphanumeric code like this:

Copy the code, paste it into the box under the Administrator password, and click Continue.

Congratulations! You're all set to use Jenkins on Ubuntu.
Hence, I'm pretty sure you understand how to install Jenkins on Ubuntu.
Build Top Apps and Enhance Your Workflow Efficiency with DevOps CI/CD Services
Tell Me More
Welcome to the last part of our Jenkins download blog. So, next, we'll learn how to install Jenkins on Mac (Hello to all Apple users). And don't worry; it's not that hard of a process.
Jenkins Installation on MacOS
You can install Jenkins on Mac using two methods – Homebrew and Docker. Here, we'll learn the installation process on Mac using the Homebrew package since it's a bit more popular than Docker. However, before directly diving into the installation part, we must know the pre-requisites of installation process on Mac.
Pre-Requisites to Install Jenkins on Mac
Hardware Requirements:
Minimum requirement:
- RAM– 256 MB
- Storage- 1 GB of Hard Disk Space
For small teams(recommended):
RAM- 4 GB
Steps to Install Jenkins on Mac
Homebrew is a macOS package manager that lets users install CLI software.
Follow the steps below to install Jenkins on Windows via Homebrew:
Step.1: Install Homebrew
Homebrew is not installed by default. So, to find out whether you have Homebrew installed, run the following command in the terminal:
brew –version
The output will return the version installed. If not installed, install Homebrew on your Mac, and then move forward.
Step.2: Check if Java is Installed
A JDK installation is necessary for Jenkins to work. Check Java installation on your Mac by running:
java –version
If Java isn't installed, a dialog box will appear stating that Java needs to be installed. Install the latest Java SDK (Software Development Kits) by running:
brew install Java
Homebrew installs the JDK files and directories at /usr/local/Cellar/openjdk/.
Step.3: Install Jenkins
Press Command + Space Bar and type "Terminal." Click the Terminal icon to open the app.

Execute the following command to download and install the latest Jenkins LTS version:
brew install jenkins-its

Step.4: Start the Jenkins Server
Before Jenkins setup, start the Jenkins server. Run:
brew services start jenkins-its

By default, Jenkins runs on port 8080.
Check if the server was appropriately started by browsing to http://localhost:8080/.

A message asking for the administrator password will appear if Jenkins initiates appropriately.
Step.5: Unlock Jenkins
After the installation, Jenkins will be locked until the administrator securely sets it up.
Following are the steps to obtain the admin password, log in, and unlock Jenkins setup:
In the terminal, view the log file containing the password in the cat command. The syntax is:
cat /Users/[user]/.jenkins/secrets/initialAdminPassword
For [user], specify your user ID.
For example:
cat /Users/marko/.jenkins/secrets/initialAdminPassword

Copy the password from the log file, paste it into the Jenkins login form, and click Continue to log in.

Complete the Jenkins setup by configuring it. Follow the instructions below:
Step.6: Customize Jenkins
After browsing to http://localhost:8080/ and entering the administrator password, proceed with customizing Jenkins by choosing one of the two options:
- Choose the Install suggested plugins to install all the most popular and most used plugins.
- To install only some specific plugins, select the Select plugins to install option and install only the ones you require.

Choosing the Install suggested plugins option automatically installs the most utilized plugins. Kindly wait for the installation to be completed.

Step.7: Create a Jenkins User
After installing all the relevant plugins, Jenkins prompts you to create the first admin user. Enter the necessary details and click Save and Continue to proceed to the following step.

Step.8: Configure the Jenkins URL
After creating the admin user, configure the Jenkins server URL. The default URL ishttp://localhost:8080/, and it is already filled in. If you want to keep the same default server URL, click Save and Finish to complete the Jenkins configuration.

After completing the whole configuration process, congratulations, the server is ready for use, and you can start generating new jobs from the main page.

Best Practices for Jenkins Installation
When installing Jenkins, following a few best‑practice patterns from the start can save you from configuration headaches, security gaps, and scaling issues later. Although Jenkins is flexible and can be deployed in many ways, the underlying principles for a clean, secure, and maintainable setup remain the same.
Choose the right deployment method
Start by picking up the installation method that matches your environment and team skill level. For beginners, native packages on Linux (such as apt to install Jenkins on Ubuntu or RHEL/CentOS) or the Windows .msi installer are often the simplest and most documented.
For more advanced or cloud‑native setups, using the official Jenkins Docker image or a Kubernetes Helm chart helps keep environments consistent and reproducible.
Prepare the environment properly
Before running any install command, ensure the prerequisites are met. Jenkins is Java‑based, so a supported JDK (or JRE) must be installed and available on the PATH.
Plan for a dedicated user and service account for Jenkins (like Jenkins on Linux) instead of running it as root and reserve a stable port (typically 8080) while making sure firewalls or security groups allow traffic to it.
Secure Jenkins from day one
By default, Jenkins enforces security, but it is important to keep it enabled and to configure authentication carefully. Avoid disabling security or using overly permissive permissions.
Instead, implement role‑based access control, enable CSRF protection, and use plugins such as the matrix or role‑strategy authorization schemes to grant only necessary permissions.
Plan for backups and upgrades
Back up your Jenkins home directory (/var/lib/Jenkins on most Linux systems) regularly, because this folder holds all builds, jobs, configurations, and plugins. Use backup plugins like Thin Backup or a periodic backup job so that you can recover quickly if the controller fails or an upgrade goes wrong.
Treat Jenkins as code
Store pipeline definitions (Jenkins files) in version control, avoid hard‑coding credentials in jobs, and whenever possible use configuration‑as‑code plugins and declarative pipelines to keep your CI/CD setup versioned, reviewable, and repeatable.
Wrapping Up!Here, we learned the basics of Jenkins and all the necessary steps to install Jenkins for different operating systems. I'd like to bring it to your attention that this blog covers working with some specific plugins, but it's your choice; you can also use different plugins available for other functions. Lastly, Jenkins helps to make the system admin's job easier as it automatically handles some of the activities based on the defined operations.A little confusing, right? Well, I understand it might get confusing and challenging when you do not have a technical background or are not thorough with different technologies. However, you can always opt for the DevOps services in the case of Jenkins. With the help of these services, you can easily install Jenkins and create custom, agile, and resilient software solutions to add extra zing to your business infrastructure.And Radixweb is always there to help you!Radixweb is a reputable DevOps service provider that helps configure the best Jenkins plugins for DevOps. With enterprise-grade infrastructure and advanced integration capabilities, our Jenkins software repository provides an ideal solution for businesses looking for successful DevOps implementations. We help you unlock the power of the Jenkins CI/CD pipeline and take your business to new heights. Our Jenkins consulting services include the latest IT solutions and services, with a team of highly experienced Jenkins developers who are always ready and happy to help.Curious to know more?Constant us ASAP and learn more about our Jenkins DevOps services.
Don't Forget to share this post!
About the Author
Dhaval Dave is the VP of Operations & Delivery at Radixweb with over 18 years of experience in enterprise software engineering and technology operations. He specializes in cloud-native architecture, SDLC optimization, and large-scale engineering delivery. Dhaval leads teams that build scalable, resilient software systems for Global 2000 organizations, ensuring operational excellence through Agile methodologies, DevOps practices, and data-driven engineering strategies.


Explore More Topics
Ready to brush up on something new? We've got more to read right this way.
Get top Insights and news from our technology experts.