
Read More

Recognized for AI Excellence at 2026 Globee® Awards - Read More
A Developer’s Guide on How to Create a CI/CD Pipeline with Jenkins

Updated : Apr 21, 2026

Quick Summary: DevOps is consistently transforming the software development and deployment process with the help of CI/CD strategy, as it ensures a continuous and automatic flow of modifications in production and shorter release cycles at minimal costs. There are several CI/CD tools available, yet developers adore using Jenkins, due to its ease of use, versatile plug-ins, flexibility, and resourcefulness. Wanna know Jenkins better? Well, this blog is a Jenkins tutorial, helping you understand the relationship between CI/CD and Jenkins.
Everyone loves DevOps and the way it is transforming the software development and deployment lifecycle. CI/CD (Continuous Integration and Continuous Delivery) plays a key role here as it enables developers to deploy quality software products right after committing the code to a repository.
However, development teams have always found it challenging to fully adopt CI/CD pipelines because of the omnipresent manual development environment and testing practices. CI/CD aims to ensure a continuous and automatic flow of software updates in production and shorter release cycles at drastically reduced costs.
Thankfully, tools like Jenkins can help you implement this complex yet efficient process.
Among all the CI/CD tools available today, Jenkins is the most recognized one due to its ease of use, versatile plug-ins, flexibility, and resourcefulness. Jenkins pipelines help us combine the capabilities of CI/CD and GitOps into a unified release process. And that is the focus of this blog.
We will begin with a quick Jenkins tutorial, how it is relevant to CI/CD, its features, benefits, and how you can create an effective Jenkins CI/CD pipeline.
On This Page
- What is Jenkins?
- How Does Jenkins Support CI/CD?
- What is Jenkins Pipeline?
- Why Should You Use Jenkins Pipelines?
- Different Types of Jenkins CI/CD Pipelines
- Key Benefits of Jenkins for CI/CD Pipelines
- How to Create a CI/CD Pipeline with Jenkins
- Best Practices for Creating Jenkins Pipelines
- Jenkins vs Other CI/CD Tools
- Let Radixweb Help You Create Jenkins CI/CD Pipelines
What is Jenkins?
Jenkins is one of the most popular DevOps automation tools written in Java. It has been around for a while and has gone through a lot of changes, introducing new features. Jenkins allows developers and release engineers to do a number of tasks in an automated way to achieve the CI process.
By automating build, test, and deployment-related operations, this automatic server makes continuous integration and continuous delivery in software projects possible. This makes it simple for everyone to consistently modify the codebase and improve the end product.
With Jenkins deployment, you can automate the software builds and get to know about potential bugs at an early stage. One of the main reasons for its popularity is a robust Jenkins community and a thriving plugin ecosystem.
How Does Jenkins Support CI/CD?
From a single task like running a functional test against the source code to executing an entire release, Jenkins manages the end-to-end deployment process. Development firms can now standardize a wide range of deployment procedures, thanks to Jenkins from its very first release.
Once a developer configures a particular job on the Jenkins server, it was possible for them to run it repeatedly in the same way according to its specifications. Jenkins handles all the work after the developer specifies which task to run and when.
Previously, developers had to manually specify their deployment methods using the Jenkins Dashboard in earlier releases of the software. Moreover, every Jenkins server has a particular job, so, updating or moving deployments between servers was very difficult.
Hence, the overall procedure was time and effort-consuming, especially if the task at hand was huge and involved multiple specifications.
Fortunately, the new Jenkins Pipelines directly address these issues.
What is Jenkins Pipeline?
As a core feature of the Jenkins build server, Jenkins Pipeline enables you to implement CI/CD pipelines by deploying it as a suite of plugins.
To deliver software from version control to end users, automated operations are organized into continuous delivery pipelines. Before publishing to production, each software update that a developer commits in source control goes through a number of automated stages. Using safe and repeatable methods to develop software, the pipeline then pushes the build through multiple testing and deployment phases.
For creating pipeline as code (DSL) and delivery pipelines of varied complexity levels, Jenkins CI/CD Pipeline provides an extendable toolkit using domain-specific languages.
Development teams can commit text-based Jenkinsfile definitions for every Jenkins pipeline to their source control repository. The pipeline as code practice, which uses the CD pipeline as a crucial component of the application code, is based on this textual approach. Team members are able to review and version it just like other code.
Join the DevOps Revolution with Vetted Developers by Your Side
Collab with Experts
Why Should You Use Jenkins Pipelines?
Developers can solve a range of problems in CI/CD with Jenkins and always make their projects production-ready.
Let me explain this: Any DevOps services team literally has hundreds of jobs in the Continuous Integration and Continuous Deployment pipeline. For example, an individual CD consists of pre- and post-deployment testing, deployment in a staging environment, deployment in production, and so on. There is also no centralization for the jobs and developers had to use lengthy code for deployment.
Take a look at the below diagram featuring the activities of just a single job:

Quite apparently, if there are thousands of such jobs in a CI/CD space, manually managing them all and any other tools is practically next to impossible.
Jenkins Pipelines solves all of these issues by managing and centralizing a large number of jobs, along with providing simple code for deployment and cost-effective maintenance:
- Any number of users can use Jenkins Pipeline as a template, update it, and run custom processes and tests as it’s written in code.
- Pipeline in Jenkins is scalable enough to support large-scale projects.
- You can run Pipeline in a loop.
- Running multiple jobs at the same time is possible.
- If Pipeline pauses for any reason, you can automatically resume it.
Different Types of Jenkins CI/CD Pipelines
As we mentioned before, Jenkins has a text file called Jenkinsfile that determines the implementation of Jenkins Pipeline in the source control repository.
And there are two main syntaxes that Jenkinsfile supports:
Scripted Pipeline
The scripted pipeline was the only choice when Jenkins Pipeline was initially released. The programmed pipeline got immediately popular among developers for two main reasons - it enables developers to add Groovy code whenever they wanted to their pipelines and offers a domain-specific language that streamlines many of the tasks a Jenkins developer would complete.
A scripted Jenkins pipeline that uses Groovy, a JVM-based programming language, has access to the huge array of APIs that are packaged with the JDK (Java Development Kit). This feature allows developers to simplify complex CI/CD pipelines.
Declarative Pipeline
Jenkins declarative pipeline is a more recent and modern implementation of pipeline as code. Since not all team members find the Groovy learning curve suitable, a declarative pipeline helps them create a more easy, opinionated, and well-structured syntax for creating efficient pipelines.
Such Jenkins Pipeline works on a Declarative Programming Model that allows you to specify your desired results. How it will get completed is not your concern. It is the best option for simpler CI/CD pipelines since it restricts what is available to the user with a more rigid and pre-configured structure.
Key Benefits of Jenkins for CI/CD Pipelines
The list of the benefits of creating CI/CD with Jenkins is a huge one. Here we have jotted down a few to help you get a better understanding:

- Plugins and Integrations
Jenkins provides a vast number of plugins, ranging from cloud to on-premises. They optimize the integration with multiple third-party systems and tools in a very short time. For example, the users of Microsoft Azure can run Continuous Integration tasks from Jenkins to Azure DevOps pipelines and the other way around.
- Free and Open-Source
Developers must get management's approval before spending money on paid tools. But software teams can download Jenkins for free wither any hassles. This open-source automation server works on cloud platforms or on-premise virtual environments.
Enable a Faster Development and Deployment Cycle by Implementing DevOps Solutions
Get It Done Now
- Tool Versions
Jenkins can bootstrap any development tool version with just one line of source code. The versions may vary, but developers need to run and include only the needed one in each Jenkins CI/CD pipeline.
- Hosting Options
Jenkins gives developers the freedom to install and deploy this server on macOS, Windows, and Linux. It can run on a Docker container as well. Using Kubernetes, you can easily scale and orchestrate this CI/CD tool.
- Robust Community
Jenkins has officially been around since 2011. Because it is open-source, software engineers, developers, and tech enthusiasts have been contributing to its improvement. It has nine special interest groups and over a million users all over the world.
How to Create a CI/CD Pipeline with Jenkins
Now that we have a pretty good overview of CI/CD Jenkins Pipeline, let’s hit the bull’s eye now and learn how to create an efficient CI/CD pipeline with the help of Jenkins:
1. Prepare the System
Prepare your system before proceeding with Jenkins installation. Any cloud platform, such as an AWS Instance or an Azure Virtual Machine, will work. In this blog, we will use Azure VM.
Stage 1
Build your Azure Virtual Machine and select the best-suited operating system. In general, Ubuntu is preferable, so we will stick with it.
Stage 2
Connect to your Virtual Machine, open it, go to the search bar, and search for network settings. After that, add one Inbound Port Rule, and click on the marked button. Here’s how the screen looks:

Stage 3
Keep the window's default settings and check the destination port ranges. As highlighted in the below image, you need to make sure that the port is 8080.
Next, you have to add this rule as Jenkins will run using it afterward. Add a second port with the number 8090 as well and edit its default name to avoid any kind of confusion.
In the following steps, we will connect to Tomcat and the webpage by using this port.

2. Download and Install Jenkins
Once your system is ready, it’s time to install Jenkins.
Stage 1
First up, install the default Java Development Kit (JDK) on your system by running the following command:
sudo apt update
sudo apt install default-jdk
Stage 2
After that, install the stable version of Jenkins using the below command:
wget -q -O - https://pkg.jenkins.io/debian-stable/jenkins.io.key | sudo apt-key add -
sudo sh -c 'echo deb https://pkg.jenkins.io/debian-stable binary/ > /etc/apt/sources.list.d/jenkins.list'
sudo apt-get update
sudo apt-get install jenkins

Stage 3
Now you have to check whether you have successfully installed Jenkins or not. If it’s running, an Active status will appear. Execute the following command:

3. Start and Configure Jenkins
Before we create Jenkins Pipelines, we first have to start and configure this tool:
Stage 1
As highlighted in the following image, copy your public IP address from your Azure VM.

Stage 2
Use the URL http://youripaddress:8080 to connect to Jenkins on the browser:

Stage 3
Your screen will display the Jenkins window. Jenkins is accessible at the address highlighted in the above image, and you must enter the administrator password to access it.
Then, return to your Jenkins server and run the following code with the marked location to fetch the pass. once you run the following code, a password will appear. Copy it, and then paste it into the password field.
sudo cat /var/lib/jenkins/secrets/initialAdminPassword
Stage 4
You have to choose the type of plugin installation after logging in successfully. To automatically install every plugin required, choose the tab "Install suggested plugins."

Stage 5
All of the plugins will take a little while to install. You then have to add a new admin user. Complete all the fields and keep them secure since you will need them to log back into your Jenkins account. You will successfully connect to your Jenkins dashboard after selecting all the finish buttons up ahead.

Redefine Your Development Team’s Efficiency with Top-Notch CI/CD Services
Show me How
Stage 6
We must now instruct Jenkins where to find Java. Use the code below to fetch the Java directory after returning to your server's command prompt. although you will see multiple directories popping up, the one we are working with is: /usr/lib/jvm/java-11-openjdk-amd64/bin/java
find / -type f -name java

Stage 7
Now you have to copy the above-mentioned location and return to the Jenkins dashboard. Under the “Manage Jenkins” section, click on “Global Tool Configuration”.

Stage 8
Now, you will land on a JDK window where you need to unselect the “Install automatically” option. As you can see in the following image, enter the Java location path and trim it.
Next, you have to select the “Install automatically” option in the below Git window:

Stage 9
This is the final step of Jenkins configuration. All you have to do is to check the box for Maven, fill in the details in the name field, and save all the settings.

4. Create Jenkins CI/CD Pipeline
Now that all configurations and setup are complete, we can start integrating CI/CD with Jenkins we will first create the Continuous Integration pipeline, followed by Continuous Deployment.
Stage 1
First of all, you need to create New Item. Click on “Freestyle project” and add an item name.

Stage 2
At this point, go to the Source Code Management window, enter the link of your GitHub repository, define the repository branch name, and save all the changes.

Stage 3
Jenkins needs to fetch all the repository files. In order to do that, select the “Build Now” option. After that, go back to the same setting page by clicking on ‘Configure’.

Stage 4
Go to the ‘Build’ tab and add the build step “Invoke top-level Maven targets”.

Stage 5
From the drop-down menu, choose your Maven name. Put all of the jobs you need to complete in the goals, separating them with a space. Your repository now contains these goals, and you need to use Maven to invoke them.
As we did in the earlier stages, save it and then once again select "Build Now" from the menu. The maven commands that create a war file will now be run.

Stage 6
Execute the directory commands on your server and go to the workspace on your Jenkins dashboard to view the war file. To view the list inside that directory, you can use the ls command since your directories and project names may vary. Remember that the directory name is case-sensitive.
cd /var/lib/jenkins/workspace/
ls
cd /Demo
cd /webapp/target
Stage 7
Your CI pipeline is almost done. Return to ‘Configure’ and click on the “Post Build Actions” tab. Select the drop-down menu and click on the “Archive the Artifacts” option. fetch all the directories and access the war file, fill in the below field with **/*.war, as shown in the following image.
Select the “Build Now” option again and the Jenkins dashboard will show all the Artifacts:

Stage 8
Now we are going to create the CD pipeline.
Go to the Tomcat Download page to complete the installation of Apache Tomcat. Hover your mouse over the ‘tar.gz’ link in the core section and copy it. After that, execute each of the following commands on your server one at a time.
- To access the file, a user group and temporary directory will first be created by four commands. Use the
curl -Ocommand and then paste the tomcat download link. - Create a tomcat directory and then extract the gzip file using further commands. But before downloading and extracting it, just verify the Tomcat version number.
- Run the following commands to configure the file permission. Make sure you modify the last command with your username.
sudo groupadd tomcat
sudo useradd -s /bin/false -g tomcat -d /opt/tomcat tomcat
cd
cd /tmp

curl -O https://dlcdn.apache.org/tomcat/tomcat-9/v9.0.54/bin/apache-tomcat-9.0.54.tar.gz
sudo mkdir /opt/tomcat
sudo tar xzvf apache-tomcat-9.0.54.tar.gz -C /opt/tomcat --strip-components=1

cd /opt/tomcat
sudo chgrp -R tomcat /opt/tomcat
sudo chmod -R g+r conf
sudo chmod g+x conf
cd ..
sudo chown -R jenkinsuser:jenkinsuser tomcat/
Automate End-to-End Development Pipeline to Speed up Your Time-to-Market
I am Ready
Stage 9
In the server.xml file, you need to change the port number from 8080 to 8090 because Jenkins already uses that and we have built port 8090 in the Azure Virtual Machine for Tomcat.
To edit the file, run the following commands and select the INSERT button after entering the file. Now look for a code that resembles the one in the image below.
Now modify the port to 8090. Click on the Esc key, enter :wq, and then press the Enter key to save the file.
cd
cd /opt/tomcat/conf
vi server.xml

Stage 10
In a similar way, you have to adjust the roles that allow you to deliver files using Tomcat by editing the tomcat-users.xml file. execute the roles code below in the file before the tomcat-users ending code. Click on the Esc key, enter :wq, and then click the Enter key to save the file.
cd
cd /opt/tomcat/conf
vi tomcat-users.xml

<role rolename="manager-gui"/>
<role rolename="manager-script"/>
<role rolename="manager-jmx"/>
<role rolename="manager-status"/>
<user username="admin" password="admin" roles="manager-gui, manager-script, manager-jmx, manager-status"/>
<user username="deployer" password="deployer" roles="manager-script"/>
<user username="tomcat" password="s3cret" roles="manager-gui"/>

Stage 11
To eliminate any IP restriction, we also need to modify the context.xml file. With the commands listed below, modify the file using the same process. As seen in the figure below, delete all the content that is inside context and save the document.

Stage 12
At this stage, you have successfully updated all the files. you now have to restart the system for all the changes so that you can update Tomcat. To stop and start Tomcat on the server, run the following commands. Tomcat is now ready to deploy the container after this step.
cd
cd /opt/tomcat/bin/
./shutdown.sh
./startup.sh
Stage 13
Go to the Jenkins Dashboard, select the “Manage Jenkins” option, and then click on “Manage Plugins”.
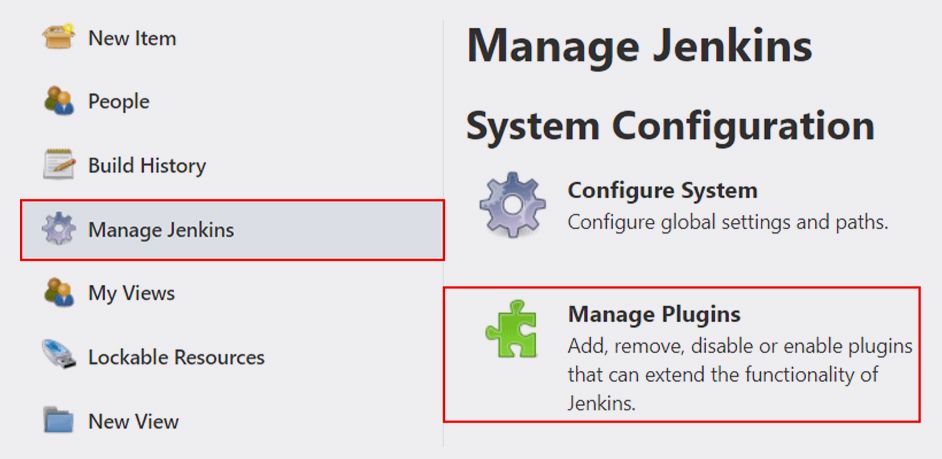
Stage 14
Search for the “Deploy to Container” plugin on the ‘Available’ tab. Click on the plugin and go for the “Install without restart” option.
Stage 15
Visit the “Post-build Actions” tab in your Configure window. Choose the 'Deploy war/ear to a container' plugin from the drop-down menu under the “Add post-build action” button. As you can see in the following below, paste the same path of your war file here.

Stage 16
Since we are using Tomcat version 9, select the "Add Container" button and click on the "Tomcat 9.x Remote" option. Here, with the new port number 8090, you need to paste the URL of the same VM. Then pick Jenkins from the drop-down menu of ‘Credentials’.

Stage 17
The following window will show up where you have to fill in the same username and password of the tomcat-users.xml file. Then enter the ID and Description and press the ‘Add’ button.

Stage 18
Select the recently created credential by clicking the drop-down button of ‘Credentials’. After saving all the settings, go back to the Jenkins dashboard and press the "Build Now" button once more. The war file will be deployed if the build is successful.

Now you can just go to your Virtual Machine address and the page will display your deployment.
Best Practices for Creating Jenkins Pipelines
Since there isn't a "universal rule" on how you can create an ideal CI/CD pipeline with Jenkins, we have compiled five tried-and-true practices that make Jenkins CI/CD projects at Radixweb a success:
Use Shared Libraries
Sometimes, different teams in a single organization design similar pipelines. To avoid duplication, it is helpful to share pipeline components throughout different projects. In order to achieve this, Jenkins Pipeline enables you to create shared libraries that you can load into your current pipelines or define in a third-party source control repository.
Avoid Groovy Code for Major Functionalities
Instead of Groovy code, utilize single steps, like shell commands, in all the Jenkins CI/CD Pipeline steps. To chain your stages together, use Groovy code. This will make your pipeline less complex and ensure that even if the number of steps increases, it can still operate without using a lot of controller resources.
Backup Each Jenkins Instance
In order to restore mistakenly deleted or corrupted files and enable disaster recovery, each Jenkins instance must have reliable backups. Shell scripts that back up Jenkins instances, backup plugins, and screenshots of the file system are some examples of backup techniques.
Use Docker Images in Pipelines
A Jenkins CI/CD Pipeline has integrated support for working with Docker within Jenkinsfiles, starting from Jenkins 2.5. For the entire pipeline or just a single stage, Jenkins allows you to use Docker images to avoid configure agents and specify the tools you require directly in the Docker image.
Delete Old Builds
Jenkins users can remove unwanted and outdated builds without affecting the Jenkins controller. You will ultimately run out of resources for new releases if you don't get rid of outdated builds. In pipeline jobs, you can use the buildDiscarderdirective to automatically discard old builds.
Jenkins vs Other CI/CD Tools
Jenkins is a powerful, self‑hosted CI/CD workhorse with deep customization via thousands of plugins, ideal for complex, on‑premise or hybrid pipelines. In contrast, modern cloud‑native tools like GitHub Actions, GitLab CI, and CircleCI emphasize simplicity, built‑in scalability, and tight integration with their respective ecosystems to reduce setup and maintenance overhead.
| Feature | Jenkins | GitHub Actions | GitLab CI/CD | CircleCI |
|---|---|---|---|---|
| Setup & Maintenance | Self-hosted setup, requires plugin and infrastructure management | Minimal setup, fully managed within GitHub | Integrated within GitLab, low setup overhead | Cloud-based with quick onboarding |
| Customization | Highly flexible with extensive plugin ecosystem | Moderate flexibility with predefined workflows | Strong flexibility within GitLab ecosystem | Configurable but less extensible than Jenkins |
| Scalability | Requires manual scaling using agents and nodes | Automatically scales with GitHub-hosted runners | Built-in scalability for pipelines | Auto-scaling with cloud runners |
| Integration | Works with almost any tool or environment | Best suited for GitHub repositories and workflows | Deep integration with GitLab repositories | Strong integrations with modern DevOps tools |
| User Experience | Traditional UI with steeper learning curve | Clean, developer-friendly interface | Unified DevOps interface | Modern and intuitive UI |
| Cost Structure | Open source, but infrastructure and maintenance add indirect costs | Usage-based pricing with free tiers | Subscription-based with integrated features | Usage-based pricing with free tier limits |
Let's Create a Strategic Jenkins CI/CD Roadmap and Boost Productivity
Start a Conversation
Let Radixweb Help You Create Jenkins CI/CD PipelinesJenkins is a modern, popular, and open-source CI/CD tool that developers absolutely admire. Jenkins configuration and monitoring may require some server administration skills, but there are numerous benefits that you can consider.The Jenkins project has a sizable ecosystem of plugins, a vibrant community, and is actively being developed. If you find it interesting, you should definitely check out Jenkins for your CI/CD requirements.We hope this Jenkins Pipeline tutorial helps you successfully integrate CI/CD into your deployment environment, and if you are still confused or need a little hand-holding, Radixweb is here to back you up. Our industry-leading Jenkins services will help you get to the bottom of your development lifecycle and deliver tangible results.So, team up with our expert Jenkins team and innovate a more efficient and quicker way to integrate your entire stack of development, testing, and deployment tools.
FAQs
What is Jenkins pipeline in DevOps?
How does Jenkins Help with automated testing?
What is a JenkinsFile?
What are the 2 types of pipelines in Jenkins?
Don't Forget to share this post!
VP – Operations & Delivery
|
18 Years of Experience


Explore More Topics
Ready to brush up on something new? We've got more to read right this way.
Get top Insights and news from our technology experts.